Send mail to users from gmail account using c#.net
Document by Alagappan -ganesanva@hotmail.com – + 919042710472
Click on File –> New Project in Visual Studio. Enter the solution name as MailUser.
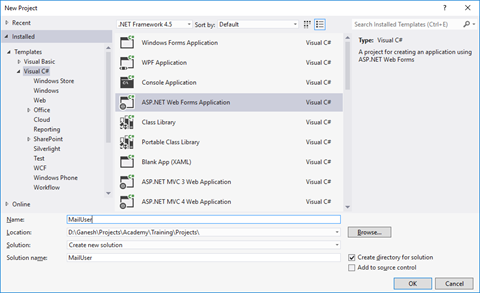
Click OK
Right Click on the Project and add new item.
Add new form with name SendEmail.aspx
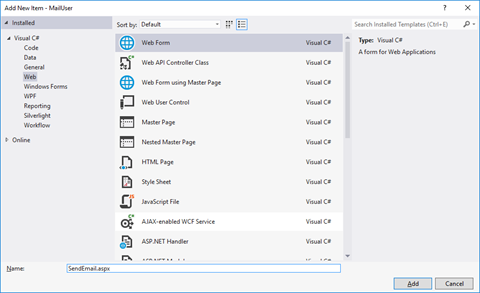
Put / Replace the below code in SendEmail.aspx
| <!DOCTYPE html> <html xmlns=”http://www.w3.org/1999/xhtml”> <head runat=”server”> <title></title> </head> <body> <form id=”form1″ runat=”server”> <div> <table border=”0″ cellspacing=”2″ cellpadding=”2″> <tr> <td> Email To </td> <td> <asp:TextBox ID=”txtMailTo” runat=”server”></asp:TextBox> </td> </tr> <tr> <td> Subject </td> <td> <asp:TextBox ID=”txtSubject” runat=”server”></asp:TextBox> </td> </tr> <tr> <td> Body </td> <td> <asp:TextBox ID=”txtBody” runat=”server” TextMode=”MultiLine”></asp:TextBox> </td> </tr> <tr> <td> </td> <td> <asp:Button ID=”btnSend” runat=”server” Text=”Send” OnClick=”btnSend_Click” /> </td> </tr> </table> </div> </form> </body> </html> |
Put / Replace the below code In SendEmail.aspx.cs
| public partial class SendEmail : System.Web.UI.Page { protected void Page_Load(object sender, EventArgs e) { } protected void btnSend_Click(object sender, EventArgs e) { string result=SendEmailtousers(txtMailTo.Text, txtSubject.Text, txtBody.Text); Response.Write(result); } protected string SendEmailtousers(string toAddress, string subject, string body) { string result = “Message Sent Successfully..!!”; string senderID = WebConfigurationManager.AppSettings[“SenderID”];// use sender’s email id here.. string senderPassword = WebConfigurationManager.AppSettings[“SenderPassword”]; // sender password here… try { SmtpClient smtp = new SmtpClient { Host = “smtp.gmail.com”, Port = 587, EnableSsl = true, DeliveryMethod = SmtpDeliveryMethod.Network, Credentials = new System.Net.NetworkCredential(senderID, senderPassword), Timeout = 30000, }; MailMessage message = new MailMessage(senderID, toAddress, subject, body); message.CC.Add(WebConfigurationManager.AppSettings[“CCMail”]); smtp.Send(message); } catch (Exception ex) { result = “Error sending email.!!!””; } return result; } } |
Add the below code in web.config below Connectionstrings tag
| <appSettings> <add key=”SenderID” value=”ganesvija@gmail.com”/> <add key=”SenderPassword” value=”*****”/> <add key=”CCMail” value=”ganesanva@hotmail.com”/> </appSettings> |
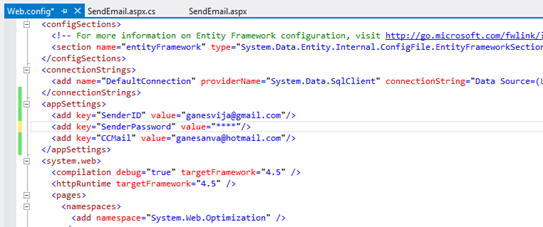
Replace **** with actual password in key SenderPassword.
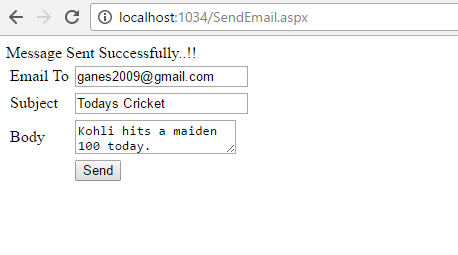
Run the solution.
The Output as below,
GMAIL inbox,

Note:
In order to trigger mail from client, Enable this on the From Address Gmail account.
Turn on Allow for Less Secure apps.

https://www.google.com/settings/security/lesssecureapps
Reference:
https://support.google.com/accounts/answer/6010255?hl=en
Click below to download the solution,
https://1drv.ms/u/s!ArddhCoxftkQg7UPuVICB-batxhXag
JQuery validation in Asp.net web application
Document by Ganesan – Ganesanva@hotmail.com – + 919042710472
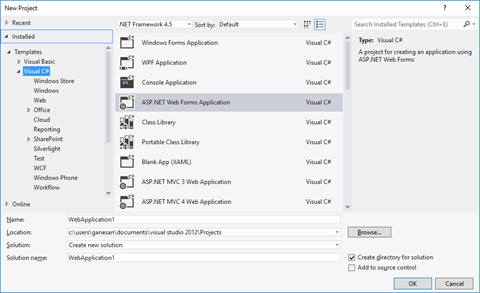
Create a new Asp.net web application using File -> New Project
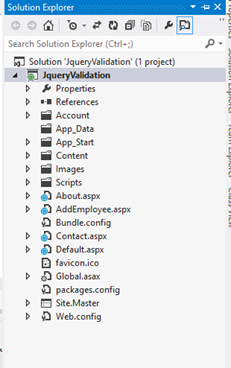
Solution Explorer looks as below,
Add new page AddEmployee.aspx
Put / replace the below code in AddEmployee.aspx
| <html xmlns=”http://www.w3.org/1999/xhtml”> <head runat=”server”> <title></title> <script src=”https://ajax.googleapis.com/ajax/libs/jquery/1.12.0/jquery.min.js”></script> <script type=”text/javascript”> function validate() { if ($(‘#txtEmployeeName’).val() == “”) { alert(‘Please enter Employee Name’); return false; } if ($(‘#txtAge’).val() == “”) { alert(‘Please enter Age’); return false; } var radios = document.getElementsByName(‘Gender’); var radioselected = ”; for (var i = 0, length = radios.length; i < length; i++) { if (radios[i].checked) { // do whatever you want with the checked radio radioselected = radios[i].value; // only one radio can be logically checked, don’t check the rest break; } } if(radioselected ==””) { alert(‘Please select Gender’); return false; } if ($(‘#ddlCity’).val() == “–Select–“) { alert(‘Please select city’); return false; } return true; } </script> </head> <body> <form id=”form1″ runat=”server”> <div> <table border=”0″ cellspacing=”2″ cellpadding=”2″> <tr> <td>Employee Name </td> <td> <asp:TextBox ID=”txtEmployeeName” runat=”server”></asp:TextBox> </td> </tr> <tr> <td>Age </td> <td> <asp:TextBox ID=”txtAge” runat=”server”></asp:TextBox> </td> </tr> <tr> <td>Gender </td> <td> <asp:RadioButton ID=”rbtnMale” runat=”server” GroupName=”Gender” Text=”Male” /> <asp:RadioButton ID=”rbtnFemale” runat=”server” GroupName=”Gender” Text=”Female” /> </td> </tr> <tr> <td>City </td> <td> <asp:DropDownList ID=”ddlCity” runat=”server”> <asp:ListItem Text=”–Select–” Value=”–Select–“></asp:ListItem> <asp:ListItem Text=”Chennai” Value=”Chennai”></asp:ListItem> <asp:ListItem Text=”Madurai” Value=”Madurai”></asp:ListItem> </asp:DropDownList> </td> </tr> <tr> <td></td> <td> <asp:Button ID=”btnSave” runat=”server” Text=”Save” OnClientClick=”return validate();” OnClick=”btnSave_Click” /> </td> </tr> </table> </div> </form> </body> </html> |
Replace the below code in AddEmployee.aspx.cs
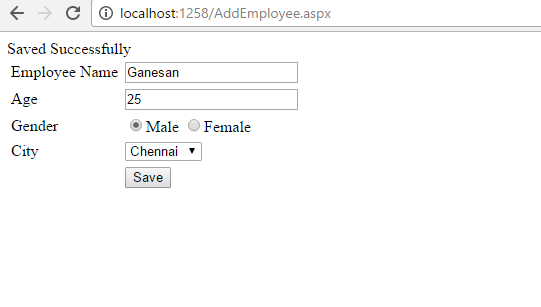
| public partial class AddEmployee : System.Web.UI.Page { protected void Page_Load(object sender, EventArgs e) { } protected void btnSave_Click(object sender, EventArgs e) { Response.Write(“Saved Successfully”); } } |
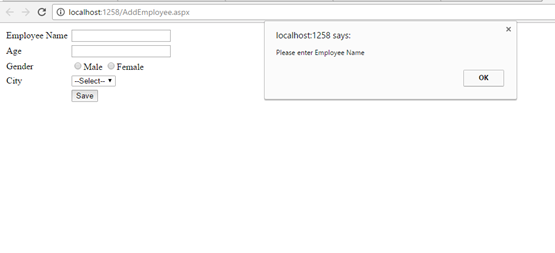
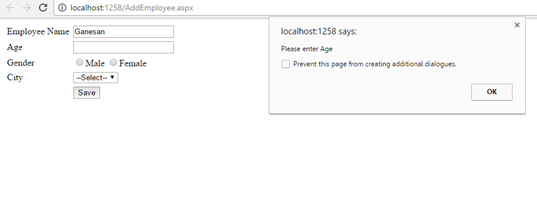
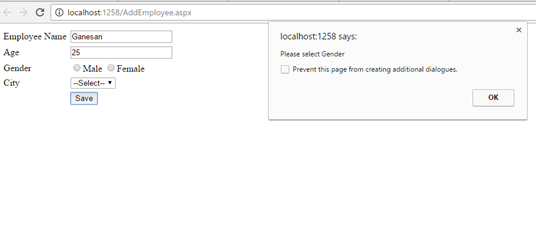
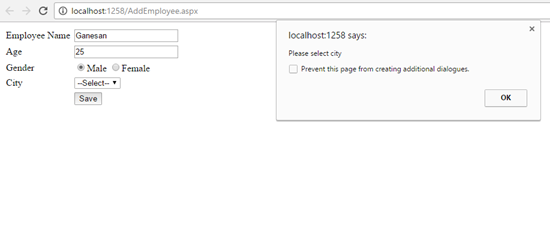
On clicking Save button ,JQuery validation Fires as below.
The Output is as below,
Note
You can check the Jquery validation using Console in Chrome.

Click below to download the solution,
https://1drv.ms/u/s!ArddhCoxftkQg6orGTGKP9owdu4fbQ
Consume Web api Http service in MVC solution
Document by Vairavan – ganesanva@hotmail.com – + 919042710472
Create a MVC solution using Code First Approach MVC Entity framework.
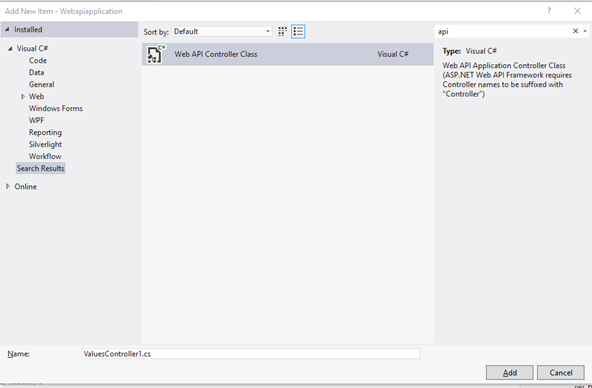
Add a Web Api Controller Class as below,
Look on the WebApiConfig.cs how the Routes are made.
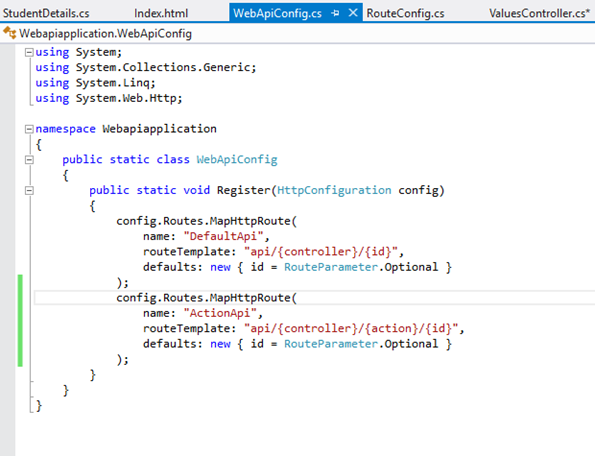
The API URL can be routed as both API/Controller/Id and Api/Controller/Action/Id by registering the Routes in Web api config.
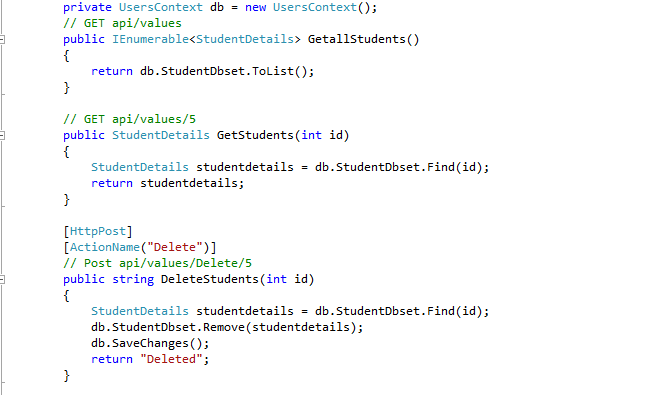
Add the Below code in Api Controller(Used for CRUD),
| private UsersContext db = new UsersContext(); // GET api/values public IEnumerable<StudentDetails> GetallStudents() { return db.StudentDbset.ToList(); } // GET api/values/5 public StudentDetails GetStudents(int id) { StudentDetails studentdetails = db.StudentDbset.Find(id); return studentdetails; } [HttpPost] [ActionName(“Delete”)] // Post api/values/Delete/5 public string DeleteStudents(int id) { StudentDetails studentdetails = db.StudentDbset.Find(id); db.StudentDbset.Remove(studentdetails); db.SaveChanges(); return “Deleted”; } // POST api/values [HttpPost] [ActionName(“Post”)] public void Post([FromBody]string value) { } // PUT api/values/5 public void Put(int id, [FromBody]string value) { } // DELETE api/values/5 public void Delete(int id) { } |
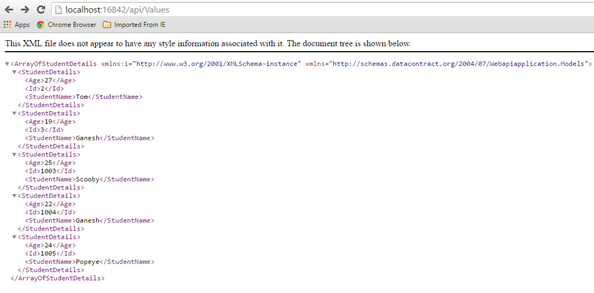
Screen clipping taken: 02-09-2016 18:44
The Above Api methods can be accessed using below URL,
http://localhost:16842/api/Values
http://localhost:16842/api/Values/5
http://localhost:16842/api/Values/Delete/5
The data can be returned as JSON,Xml or any other format depends on the attribute.
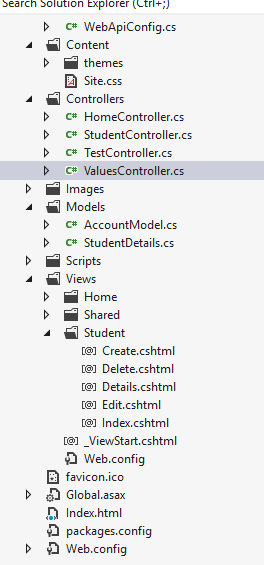
Create a new HTML page in the Solution as index.html
Put below code in Index.html,
| <!DOCTYPE html> <html xmlns=”http://www.w3.org/1999/xhtml”> <head> <title>Product App</title> </head> <body> <div> <h2>All Products</h2> <ul id=”products” /> </div> <div> <h2>Search by ID</h2> <input type=”text” id=”prodId” size=”5″ /> <input type=”button” value=”Search” onclick=”find();” /> <p id=”product” /> </div> <script src=”http://ajax.aspnetcdn.com/ajax/jQuery/jquery-2.0.3.min.js”></script> <script> var uri = ‘/api/values’; $(document).ready(function () { // Send an AJAX request $.getJSON(uri) .done(function (data) { // On success, ‘data’ contains a list of products. $.each(data, function (key, item) { // Add a list item for the product. $(‘<li>’, { text: formatItem(item) }).appendTo($(‘#products’)); }); }); }); function formatItem(item) { return item.studentName + ‘: $’ + item.Age; } function find() { var id = $(‘#prodId’).val(); $.getJSON(uri + ‘/’ + id) .done(function (data) { $(‘#product’).text(formatItem(data)); }) .fail(function (jqXHR, textStatus, err) { $(‘#product’).text(‘Error: ‘ + err); }); } </script> </body> </html> |
Now the MVC Application Works with Controller web api repository and a HTML page.
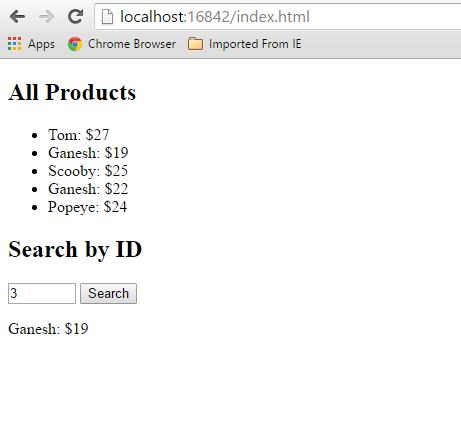
The output will be,
Click below to download the solution,
https://1drv.ms/u/s!ArddhCoxftkQg6hMmGfATxDIT2rtJw
Reference
http://www.asp.net/web-api/overview/getting-started-with-aspnet-web-api/tutorial-your-first-web-api
http://www.asp.net/web-api/overview/web-api-routing-and-actions/routing-in-aspnet-web-api
Consume WCF application in MVC
Document by Ganesan – Ganesanva@hotmail.com – + 919600370429
Create a new MVC application.
Create Connection string in Web.config as below.
| <connectionStrings> <add name=”TestConnection” connectionString=”Data Source=(LocalDb)\v11.0;Initial Catalog=TestDB;Integrated Security=True;Pooling=False” providerName=”System.Data.SqlClient” /> </connectionStrings> |
Create StudentDetails.cs Class file as below.
| [DataContract] public class StudentDetails { [DataMember] public int Id { get; set; } [DataMember] public string StudentName { get; set; } [DataMember] public int? Age { get; set; } } |
Create DBContext.Cs file as below
| public class UsersContext : DbContext { public UsersContext() : base(“TestConnection”) { } public DbSet<StudentDetails> studentDbset { get; set; } } |
Create ScafFolding and autogenerate Views and controllers.
Make sure the Code now works in DB first approach. After this we are going to change the
data source to consume From WCF.
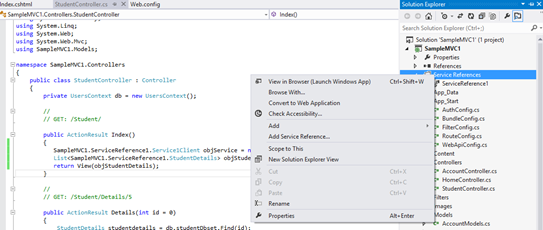
Create Service Reference as below,
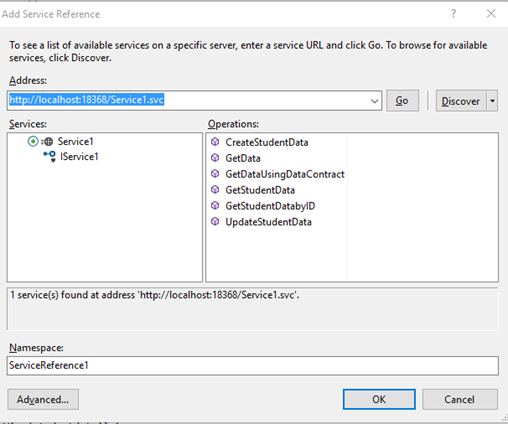
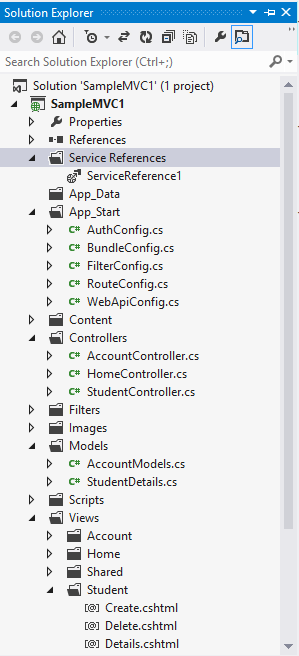
Click OK. Now the service reference will be added as below,
Replace the Controller methods for CRUD as below,
| public ActionResult Index() { SampleMVC1.ServiceReference1.Service1Client objService = new ServiceReference1.Service1Client(); List<SampleMVC1.ServiceReference1.StudentDetails> objStudentDetails= objService.GetStudentData(); return View(objStudentDetails); } [HttpPost] public ActionResult Create(SampleMVC1.ServiceReference1.StudentDetails studentdetails) { if (ModelState.IsValid) { SampleMVC1.ServiceReference1.Service1Client objService = new ServiceReference1.Service1Client(); string result= objService.CreateStudentData(studentdetails); return RedirectToAction(“Index”); } return View(studentdetails); } // // GET: /Student/Edit/5 public ActionResult Edit(int id = 0) { SampleMVC1.ServiceReference1.Service1Client objService = new ServiceReference1.Service1Client(); SampleMVC1.ServiceReference1.StudentDetails studentdetails = objService.GetStudentDatabyID(id); if (studentdetails == null) { return HttpNotFound(); } return View(studentdetails); } // // POST: /Student/Edit/5 [HttpPost] public ActionResult Edit(SampleMVC1.ServiceReference1.StudentDetails studentdetails) { if (ModelState.IsValid) { SampleMVC1.ServiceReference1.Service1Client objService = new ServiceReference1.Service1Client(); string result = objService.UpdateStudentData(studentdetails); return RedirectToAction(“Index”); } return View(studentdetails); } |
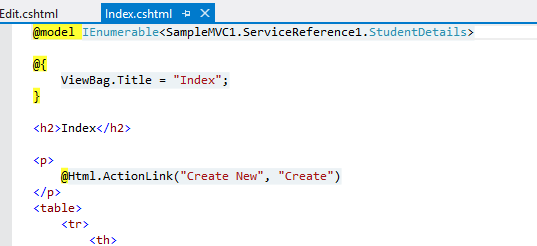
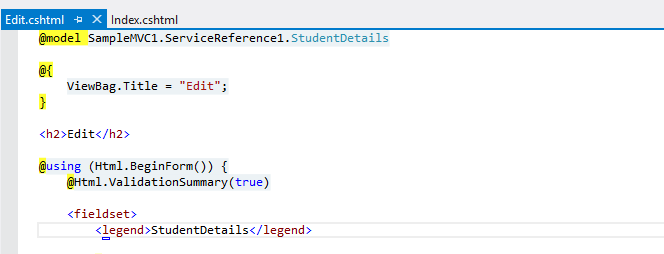
Replace the view First line I.E model reference to point to Service model
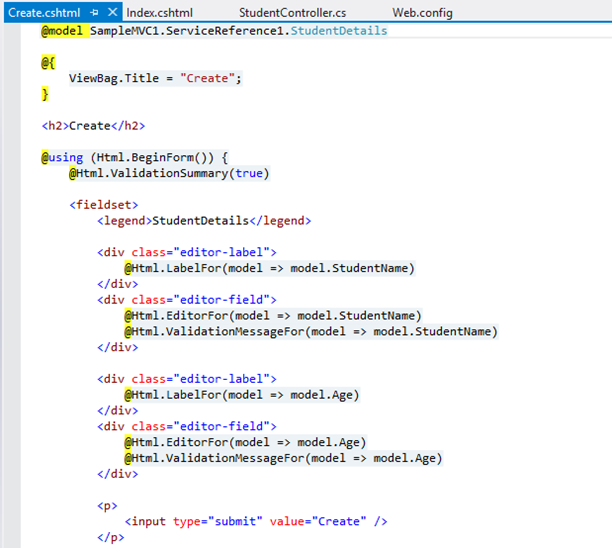
Similar for other pages too.
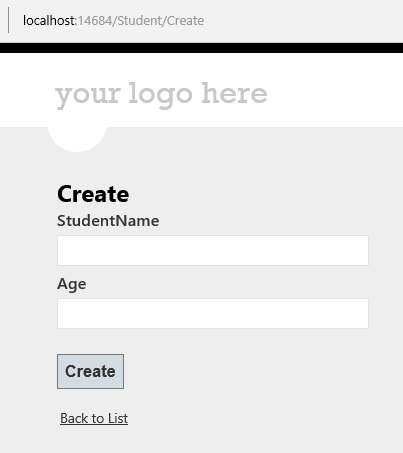
Now the pages will be like below
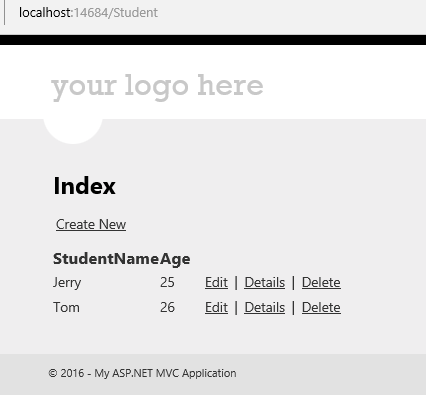
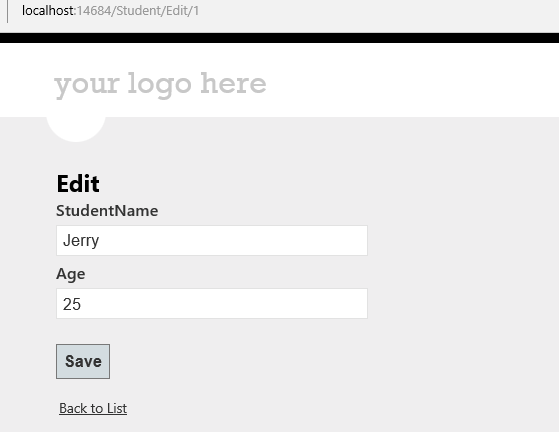
Click on the Link below to get the sample solution
https://1drv.ms/u/s!ArddhCoxftkQg6gdCJeDrlqBAJE0vg
Recent Posts
Categories
- All
- Angularjs training in Chennai
- ASP.NET Core
- dot net training
- dot net training in chennai
- dotnet full stack developer
- Free dotnet training
- information on dotnet
- Learn Java in chennai
- Learn Python at Karaikudi
- learn python online
- learn python online from chennai
- Linq Queries in .net
- mutual funds
- MVC Training Tutorials
- PHP Training in Chennai
- pmp training online
- power apps online training
- Python Training Online
- share market
- Sharepoint framework online training
- SharePoint Freelancers in Chennai
- software testing
- spfx online training
- Stock market
- Uncategorized
