Web API with ASP.NET Core using MVC
Creating a web API with ASP.NET Core using the MVC (Model-View-Controller) pattern entails creating controllers to handle HTTP requests, models to represent data, and routes for the API. A step-by-step guide to creating an MVC web API with ASP.NET Core is provided below.
Step 1 Install the Necessary Software
Check that your machine has the.NET SDK installed.
Step 2 Create a New ASP.NET Core MVC Web API Project
Run the following commands in a terminal or command prompt
dotnet new mvc -n MyMvcWebApi
cd MyMvcWebApi
This will create a new ASP.NET Core MVC project called MyMvcWebApi and navigate to its directory.
Step 3 Explore the Project Structure
Launch your preferred IDE and open the project. Controllers, Models, and Views are among the folders in the project structure.
Controllers In this section, you will define your API controllers.
Models To represent your data, you can create model classes.
Views Although views are not required for an API, this folder is included in the standard MVC structure.
Step 4 Create a Model
To represent your data, create a model class. Create a file called Item.cs in the Models folder, for example
public class Item
{
public int Id { get; set; }
public string Name { get; set; }
}
Step 5 Establish a Controller
Add a new file to the Controllers folder, such as ItemsController.cs, to create a controller
using Microsoft.AspNetCore.Mvc;
using System.Collections.Generic;
namespace MyMvcWebApi.Controllers
{
[Route(api[controller])]
[ApiController]
public class ItemsController ControllerBase
{
private static ListItem _items = new ListItem
{
new Item { Id = 1, Name = Item 1 },
new Item { Id = 2, Name = Item 2 },
new Item { Id = 3, Name = Item 3 }
};
GET apiitems
[HttpGet]
public ActionResultIEnumerableItem Get()
{
return _items;
}
GET apiitems1
[HttpGet({id})]
public ActionResultItem Get(int id)
{
var item = _items.Find(i = i.Id == id);
if (item == null)
return NotFound();
return item;
}
POST apiitems
[HttpPost]
public ActionResultItem Post([FromBody] Item newItem)
{
newItem.Id = _items.Count + 1;
_items.Add(newItem);
return CreatedAtAction(nameof(Get), new { id = newItem.Id }, newItem);
}
PUT apiitems1
[HttpPut({id})]
public IActionResult Put(int id, [FromBody] Item updatedItem)
{
var existingItem = _items.Find(i = i.Id == id);
if (existingItem == null)
return NotFound();
existingItem.Name = updatedItem.Name;
return NoContent();
}
DELETE apiitems1
[HttpDelete({id})]
public IActionResult Delete(int id)
{
var itemToRemove = _items.Find(i = i.Id == id);
if (itemToRemove == null)
return NotFound();
_items.Remove(itemToRemove);
return NoContent();
}
}
}
Step 6 Run the Program
Enter the following command at the command prompt or terminal
dotnet run
The URL for your API will be http://localhost:5000 or https://localhost:5001. Open an API testing tool such as Postman:
GET Request: To retrieve items, open https://localhost:5001/api/items.
POST Request: To add a new item, submit a POST request with a JSON body to https://localhost:5001/api/items.
PUT Request: To update an item, submit a PUT request with a JSON body to https://localhost:5001/api/items/1.
DELETE Request: To delete an item, send a DELETE request to https://localhost:5001/api/items/1.
Step 7 Explore and Extend
To improve your web API, investigate additional ASP.NET Core MVC features like middleware, authentication, dependency injection, and model binding. Depending on the needs of your application, you can handle various HTTP methods, define more models, and add more controllers.
Consume Web api Http service in MVC solution
Document by Vairavan – ganesanva@hotmail.com – + 919042710472
Create a MVC solution using Code First Approach MVC Entity framework.
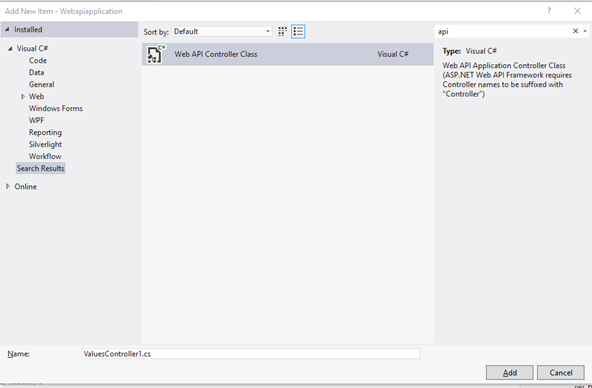
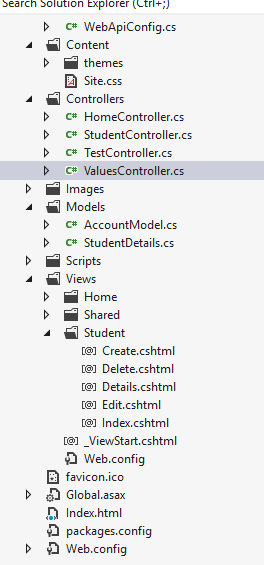
Add a Web Api Controller Class as below,
Look on the WebApiConfig.cs how the Routes are made.
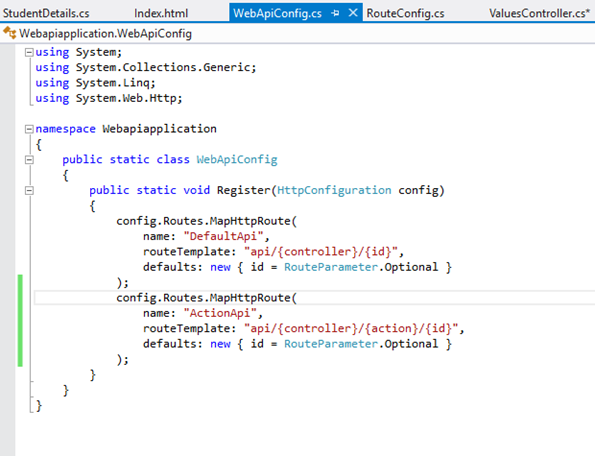
The API URL can be routed as both API/Controller/Id and Api/Controller/Action/Id by registering the Routes in Web api config.
Add the Below code in Api Controller(Used for CRUD),
| private UsersContext db = new UsersContext(); // GET api/values public IEnumerable<StudentDetails> GetallStudents() { return db.StudentDbset.ToList(); } // GET api/values/5 public StudentDetails GetStudents(int id) { StudentDetails studentdetails = db.StudentDbset.Find(id); return studentdetails; } [HttpPost] [ActionName(“Delete”)] // Post api/values/Delete/5 public string DeleteStudents(int id) { StudentDetails studentdetails = db.StudentDbset.Find(id); db.StudentDbset.Remove(studentdetails); db.SaveChanges(); return “Deleted”; } // POST api/values [HttpPost] [ActionName(“Post”)] public void Post([FromBody]string value) { } // PUT api/values/5 public void Put(int id, [FromBody]string value) { } // DELETE api/values/5 public void Delete(int id) { } |
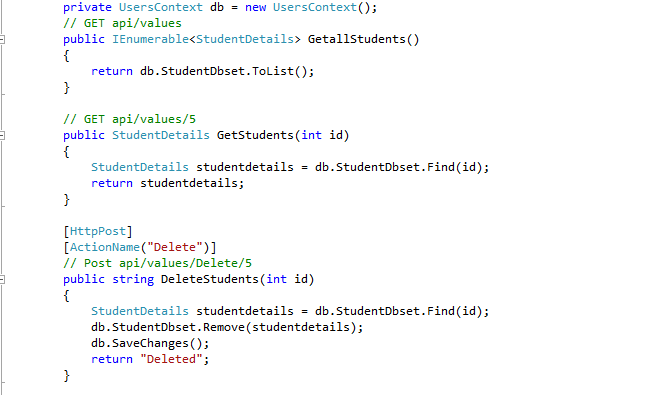
Screen clipping taken: 02-09-2016 18:44
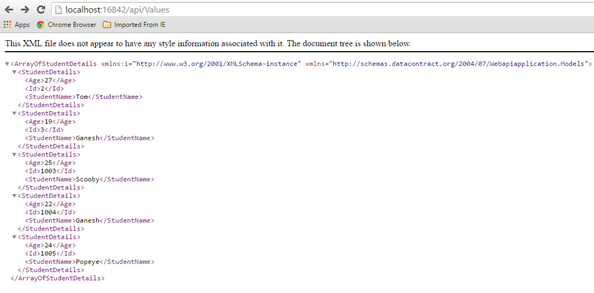
The Above Api methods can be accessed using below URL,
http://localhost:16842/api/Values
http://localhost:16842/api/Values/5
http://localhost:16842/api/Values/Delete/5
The data can be returned as JSON,Xml or any other format depends on the attribute.
Create a new HTML page in the Solution as index.html
Put below code in Index.html,
| <!DOCTYPE html> <html xmlns=”http://www.w3.org/1999/xhtml”> <head> <title>Product App</title> </head> <body> <div> <h2>All Products</h2> <ul id=”products” /> </div> <div> <h2>Search by ID</h2> <input type=”text” id=”prodId” size=”5″ /> <input type=”button” value=”Search” onclick=”find();” /> <p id=”product” /> </div> <script src=”http://ajax.aspnetcdn.com/ajax/jQuery/jquery-2.0.3.min.js”></script> <script> var uri = ‘/api/values’; $(document).ready(function () { // Send an AJAX request $.getJSON(uri) .done(function (data) { // On success, ‘data’ contains a list of products. $.each(data, function (key, item) { // Add a list item for the product. $(‘<li>’, { text: formatItem(item) }).appendTo($(‘#products’)); }); }); }); function formatItem(item) { return item.studentName + ‘: $’ + item.Age; } function find() { var id = $(‘#prodId’).val(); $.getJSON(uri + ‘/’ + id) .done(function (data) { $(‘#product’).text(formatItem(data)); }) .fail(function (jqXHR, textStatus, err) { $(‘#product’).text(‘Error: ‘ + err); }); } </script> </body> </html> |
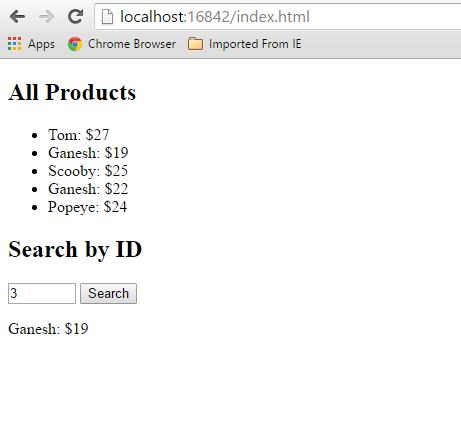
Now the MVC Application Works with Controller web api repository and a HTML page.
The output will be,
Click below to download the solution,
https://1drv.ms/u/s!ArddhCoxftkQg6hMmGfATxDIT2rtJw
Reference
http://www.asp.net/web-api/overview/getting-started-with-aspnet-web-api/tutorial-your-first-web-api
http://www.asp.net/web-api/overview/web-api-routing-and-actions/routing-in-aspnet-web-api
Recent Posts
Categories
- All
- Angularjs training in Chennai
- ASP.NET Core
- dot net training
- dot net training in chennai
- dotnet full stack developer
- Free dotnet training
- information on dotnet
- Learn Java in chennai
- Learn Python at Karaikudi
- learn python online
- learn python online from chennai
- Linq Queries in .net
- mutual funds
- MVC Training Tutorials
- PHP Training in Chennai
- pmp training online
- power apps online training
- Python Training Online
- share market
- Sharepoint framework online training
- SharePoint Freelancers in Chennai
- software testing
- spfx online training
- Stock market
- Uncategorized
